Z-Wave Danfoss LC-13 Living Connect Radiator Thermostat


They appear to be equally respected across the home automation forums in terms of reliability, battery life and ease of connection. Aesthetically I prefer the Danfoss valves and it is these that HeatGenius adopted for their system. The only doubts I had were over problems that people reported with the early versions, but these seem to have been fixed with version 2. I decided I would purchase a single Danfoss valve to try out.
But how easy would it be to add the Danfoss valve to an existing system?
According to the manufacturer "The battery-powered thermostat is easily fitted to most radiator types in just a few minutes, " and online videos seemed to back this up. Further investigation revealed that it comes with two types of adapter
RA and M30 x 1.5(K) valve adapters
RA and M30 x 1.5(K) valve adapters
which is probably fine for the majority of UK homes. However, older houses like mine tend to have a mix of valves of various ages that have been added over time, so it was time to carry out a radiator audit.
The results of my radiator audit
17 radiators in total
3 old school radiators with no TRVs
2 radiators with Honeywell TRVs
6 radiators with Pro Heat TRVs
6 radiators with Giacomini TRVs

|

|

|
| Honeywell TRV | Giacomini TRV | Pro Heat TRV |
I was confident that the supplied M30 adapters would work with all but the Giacomini TRVs and ordered a single Danfoss LC-13 to get going with. It was easy to install this in place of both the Pro Heat and the Honeywell TRVs, but as suspected there was no suitable adapter for the Giacomini. Unfortunately the Living Room has two of these (and a Pro Heat) and as this was to be the first of my controllable rooms it was important to find a way of adapting or replacing these valves. I certainly did not want to be draining down the system to install new TRVs at such an early stage in the project.
A word on radiator adapters
Most TRVs sold in the UK today are of the M30 x 1.5mm variety. M30 refers to the 30mm measurement across the thread and 1.5mm is the pitch of the thread. Standardizing this fitting has allowed heads from other manufacturers to be fitted onto already installed bodies. However, many homes are fitted with older, less standard valves whose bodies will not work with M30 heads or whose pin size is incompatible.
This has led to the marketing of numerous valve adapters allowing M30 valve heads to replace older (perhaps malfunctioning) heads without the need to replace the whole body (with its associated installation costs).
It was my understanding that if a suitable adapter could be found then I could use this in addition to the M30 to Danfoss adapter supplied. So, the search was on:
Vesternet (from whom I purchased my Danfoss valve) sell a few adapters:
M28 - Comap
M28 - Herz
M28 - MMA or S&B
but none are compatible with my Giacominis.
The only place in the UK that I could find a suitable candidate was Heating Controls Online:
 |
| Click here to go to actual page |
I had also seen what looked like the same thing for sale on ebay and amazon (both from Germany). In Germany, the TRV brand is Heimeir but it looks identical to the Giacomini. And here is a picture of the adapter showing the part number as 9700-33.

With postage, they are no cheaper than those from the UK. At around £15 each, it is an expensive solution but I took a chance and ordered two from heatingcontrolsonline. On arrival I noted the same part number as those sold from Germany which gives an extra purchasing option in the future.
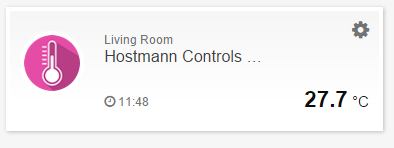
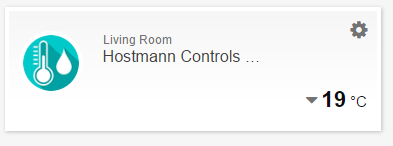
Fitting the Living Room TRVs
I removed the Giacomini heads from the living room and fitted the adapters. This was a bit fiddly as they are not screw on and require a tiny allen key. Once fitted I screwed the M30 adapter on top and fitted the Danfoss Living Connect. The fit is secure, but I am not sure the pin gets pushed completely to the bottom so it is possible they may not close completely. It is a good enough solution though.
By this stage I had had some time to experiment with controlling the single Danfoss LC via the ZWay software on the Raspberry Pi and was satisfied with the results. I ordered two more Danfoss TRVs and got ready to take control of the Living Room.
For anyone having issues finding suitable adapters, this handy chart lists out many TRVs around in the UK and HeatGenius have a useful online compatibility checker.